Posted by Express Sewer & Drain Team on
The toilet is known by many names – the commode, the john, the head, the loo, the can… the list goes on. But how exactly does this porcelain throne work? In this blog, we’ll dive into the history of the toilet and its inner workings, along with some DIY recommendations.
How a Toilet Works
A toilet is a simple yet efficient system that uses gravity and water pressure to remove waste. It consists of several key components, including the tank, bowl, flush handle, flapper, fill valve, and siphon. When you flush, a series of steps occur to ensure waste is carried away and clean water refills the bowl.
Steps in the Toilet Flush Cycle
-
Pressing the Flush Handle: When you push the handle, it lifts a chain connected to the flapper inside the tank.
-
Flapper Opens: The flapper, a rubber valve at the bottom of the tank, lifts, allowing water to rush from the tank into the bowl.
-
Water Creates a Siphon Effect: The water flows rapidly into the bowl, creating a siphon effect that pulls waste and water through the trapway and into the sewer line.
-
Flapper Closes: Once the tank empties, the flapper settles back into place, sealing the tank and stopping the flow of water.
-
Refill Valve Activates: The fill valve refills the tank with fresh water from the supply line.
-
Float Rises and Shuts Off Water Flow: A floating mechanism (float ball or cup) rises with the water level. Once it reaches the appropriate height, it signals the fill valve to stop adding water.
-
Bowl Refill: A small amount of water flows into the bowl through the refill tube to maintain a proper water level and prevent sewer gases from escaping.
Once these steps are complete, the toilet is ready for the next flush. Understanding how a toilet works can help diagnose common issues like running water, weak flushes, or clogs.
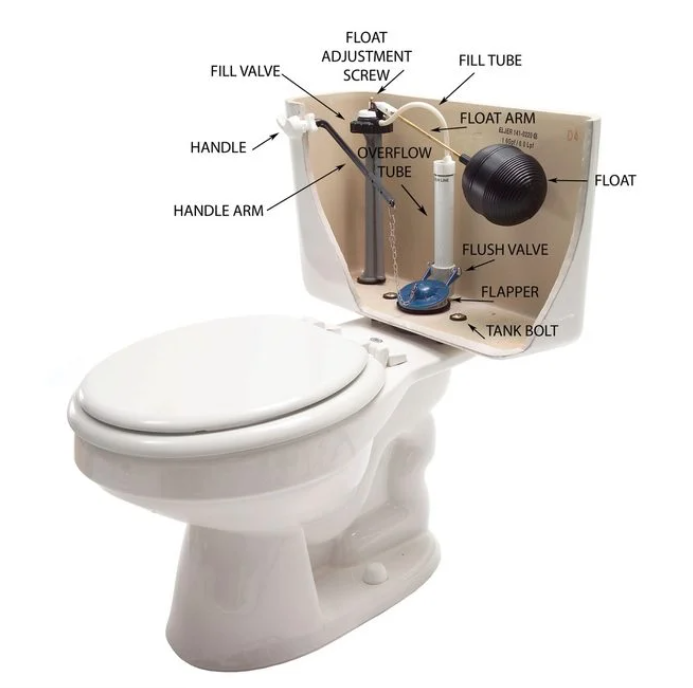
Parts of a Toilet

Now, let’s get familiar with the parts of a toilet. Knowing what’s on the inside of a toilet will help you should you decide to tackle some DIY toilet repairs in the wake of toilet plumbing problems.
- Fill Tube: The fill tube (or refill tube) connects the fill valve and overflow tube. As the fill valve is signaling for the tank to refill, a little bit of this incoming water flows from the fill valve, into the fill tube, and then into the overflow tube, which dumps clean water into the bowl.
- Fill Valve: This controls the flow of fresh water into the tank of your toilet. It is usually mounted on the left side of the toilet tank, with a tailpiece that extends through the bottom of the tank where it attaches to a supply tube that runs to the shut-off valve. It also controls the water level in the toilet tank. There are two types:
- Float Fill Valve: Also called a bobber, ball cock, or fill valve, these valves have a floating “ball” in the tank that rises with the water level and shuts off water flow when the tank is full. They are connected to the fill valve by a float arm.
- Floatless Fill Valve: These fill valves use a diaphragm pressure-sensing mechanism rather than any kind of float device to control the inlet valve. These valves are attached to the bottom of the tank and operate underwater.
- Flapper: The seal between the tank and the bowl that lifts when you flush, allowing clean tank water to fill the bowl.
- Float Adjustment Screw: This controls the float level. Turn it clockwise to lower the water level, and counterclockwise to raise it.
- Handle/Handle Arm: An arm inside the tank that is connected to the exterior handle and the flapper. When the handle is depressed, the arm lifts the flapper on the inside.
- Overflow Tube: This vertical fixture ensures excess water from the tank does not overflow. It goes into action if the fill valve malfunctions or breaks.
- Tank/Tank Bolts: The water-storing tank that sits on the back of the toilet above the bowl. Tank bolts connect it to the bowl.
How to Replace Toilet Tank Parts
Fixing a toilet may seem like a daunting task, but it’s actually a fairly simple DIY project. That’s because, unlike more modern appliances in our home, the toilet is not a very complex piece of equipment!
Gather the Necessary Tools and Materials
Before you begin the process, make sure you have the right equipment. Replacing toilet parts typically requires:
- Adjustable wrench
- Sponge or towel
- Bucket
- Replacement parts (flapper, fill valve, flush handle, etc.)
Steps to Replace Toilet Parts
When a toilet has trouble, rarely do you have to replace the entire toilet (though if you do, check out our toilet installation guide). Often, you simply need to replace toilet tank parts. You can purchase the toilet tank parts separately, or you can find them packaged together in repair kits. Follow these steps if you need to repair your toilet:
-
Turn Off the Water Supply: Locate the shutoff valve near the toilet’s base and turn it clockwise to stop the water flow.
-
Drain the Tank: Flush the toilet to empty most of the water. Use a sponge or towel to soak up any remaining water in the tank.
-
Replace the Flapper (If Leaking or Not Sealing)
- Unhook the old flapper from the overflow tube.
- Attach the new flapper, ensuring a secure fit.
- Connect the chain to the flush handle, leaving slight slack.
-
Replace the Fill Valve (If the Toilet Won’t Refill or Constantly Runs)
- Unscrew the water supply line from the bottom of the tank using an adjustable wrench.
- Remove the old fill valve by loosening the locknut underneath the tank.
- Insert the new fill valve and secure it with the locknut.
- Reconnect the water supply line.
-
Replace the Flush Handle (If Sticking or Broken)
- Unscrew the mounting nut inside the tank (turn it clockwise, as it’s reverse-threaded).
- Remove the old handle and insert the new one through the hole.
- Tighten the nut and attach the chain to the flush arm.
-
Turn the Water Supply Back On: Slowly turn the shutoff valve counterclockwise and let the tank refill.
-
Test the Flush: Flush the toilet a few times to ensure everything functions properly and there are no leaks.
If your toilet is running constantly, or if it’s refusing to flush (and not because of a clogged drain), we recommend this video by plumber Roger Wakefield. He’ll walk you through how to replace the insides of a toilet. View the video.
Having Toilet Trouble and Need an Expert Plumber?
Not up to the DIY toilet challenge? Or, do you have another issue with your toilet? It’s not always easy to determine whether you need to replace or simply repair your toilet. Contact Express Sewer & Drain in Sacramento for all your residential and commercial plumbing needs.

Topics: Commercial Plumbing, Home Plumbing, Drain Cleaning and Repair